Định cấu hình máy chủ Asterisk VoIP của bạn cho Odoo
Cài đặt Asterisk Server
Phụ thuộc
Trước khi cài đặt Asterisk, bạn cần cài đặt các phụ thuộc sau:
wget
GCC
G ++
Ncurses-devel
libxml2-divel
SQLITE-DEVEL
libsrtp-devel
LIBUUID-DEVEL
openSSL-devel
PKG-Config
Để cài đặt LIBSRTP, hãy làm theo các hướng dẫn bên dưới:
cd /usr/local/src/
wget http://srtp.sourceforge.net/srtp-1.4.2.tgz
tar zxvf srtp-1.4.2.tgz
cd /usr/local/src/srtp
./configure CFLAGS=-fPIC --prefix=/usr/local/lib
make && make install
You also need to install PJSIP, you can download the source here. Once the source directory is extracted:
** Thay đổi thư mục nguồn PJProject: **
# cd pjproject
chạy:
# ./configure --prefix=/usr --enable-shared --disable-sound --disable-resample --disable-video --disable-opencore-amr CFLAGS='-O2 -DNDEBUG'
** Xây dựng và cài đặt PJProject: **
# make dep
# make
# make install
** Cập nhật các liên kết thư viện được chia sẻ: **
# ldconfig
** Xác minh rằng PJProject đã được cài đặt: **
# ldconfig -p | grep pj
** Kết quả nên là: **
libpjsua.so (libc6,x86-64) => /usr/lib/libpjsua.so
libpjsip.so (libc6,x86-64) => /usr/lib/libpjsip.so
libpjsip-ua.so (libc6,x86-64) => /usr/lib/libpjsip-ua.so
libpjsip-simple.so (libc6,x86-64) => /usr/lib/libpjsip-simple.so
libpjnath.so (libc6,x86-64) => /usr/lib/libpjnath.so
libpjmedia.so (libc6,x86-64) => /usr/lib/libpjmedia.so
libpjmedia-videodev.so (libc6,x86-64) => /usr/lib/libpjmedia-videodev.so
libpjmedia-codec.so (libc6,x86-64) => /usr/lib/libpjmedia-codec.so
libpjmedia-audiodev.so (libc6,x86-64) => /usr/lib/libpjmedia-audiodev.so
libpjlib-util.so (libc6,x86-64) => /usr/lib/libpjlib-util.so
libpj.so (libc6,x86-64) => /usr/lib/libpj.so
Dấu hoa thị
In order to install Asterisk 13.7.0, you can download the source directly there.
Trích xuất dấu hoa thị:
tar zxvf asterisk*
Nhập thư mục Asterisk:
cd ./asterisk*
Chạy tập lệnh cấu hình dấu hoa thị:
./configure --with-pjproject --with-ssl --with-srtp
Chạy công cụ Menuselect Asterisk:
make menuselect
Trong menuSelect, đi đến tùy chọn tài nguyên và đảm bảo rằng res_srtp được bật. Nếu có 3 X, bên cạnh res_srtp, có một vấn đề với thư viện SRTP và bạn phải cài đặt lại nó. Lưu cấu hình (nhấn x). Bạn cũng nên thấy các ngôi sao ở phía trước các dòng res_pjsip.
Biên dịch và cài đặt Asterisk:
make && make install
Nếu bạn cần cấu hình mẫu, bạn có thể chạy 'tạo mẫu' để cài đặt cấu hình mẫu. Nếu bạn cần cài đặt tập lệnh khởi động Asterisk, bạn có thể chạy 'Tạo cấu hình'.
Chứng chỉ DTLS
Sau khi bạn cần thiết lập chứng chỉ DTLS.
mkdir /etc/asterisk/keys
Nhập thư mục Scripts Asterisk:
cd /asterisk*/contrib/scripts
Tạo chứng chỉ DTLS (thay thế pbx.mycompany.com bằng địa chỉ IP hoặc tên DNS của bạn, thay thế công ty siêu của tôi bằng tên công ty của bạn):
./ast_tls_cert -C pbx.mycompany.com -O "My Super Company" -d /etc/asterisk/keys
Định cấu hình Máy chủ Asterisk
For WebRTC, a lot of the settings that are needed MUST be in the peer settings. The global settings do not flow down into the peer settings very well. By default, Asterisk config files are located in /etc/asterisk/. Start by editing http.conf and make sure that the following lines are uncommented:
;http.conf
[general]
enabled=yes
bindaddr=127.0.0.1 ; Replace this with your IP address
bindport=8088 ; Replace this with the port you want to listen on
Tiếp theo, chỉnh sửa sip.conf. Ngang hàng WEBRTC yêu cầu mã hóa, AVPF và ICesupport được bật. Trong hầu hết các trường hợp, DirectMedia nên bị vô hiệu hóa. Cũng theo máy khách WEBRTC, vận chuyển cần được liệt kê là ‘WS, để cho phép các kết nối WebSocket. Tất cả các dòng cấu hình này phải nằm dưới chính bạn; Đặt các dòng cấu hình này trên toàn cầu có thể không hoạt động:
;sip.conf
[general]
realm=127.0.0.1 ; Replace this with your IP address
udpbindaddr=127.0.0.1 ; Replace this with your IP address
transport=udp

[1060] ; This will be WebRTC client
type=friend
username=1060 ; The Auth user for SIP.js
host=dynamic ; Allows any host to register
secret=password ; The SIP Password for SIP.js
encryption=yes ; Tell Asterisk to use encryption for this peer
avpf=yes ; Tell Asterisk to use AVPF for this peer
icesupport=yes ; Tell Asterisk to use ICE for this peer
context=default ; Tell Asterisk which context to use when this peer is dialing
directmedia=no ; Asterisk will relay media for this peer
transport=udp,ws ; Asterisk will allow this peer to register on UDP or WebSockets
force_avp=yes ; Force Asterisk to use avp. Introduced in Asterisk 11.11
dtlsenable=yes ; Tell Asterisk to enable DTLS for this peer
dtlsverify=no ; Tell Asterisk to not verify your DTLS certs
dtlscertfile=/etc/asterisk/keys/asterisk.pem ; Tell Asterisk where your DTLS cert file is
dtlsprivatekey=/etc/asterisk/keys/asterisk.pem ; Tell Asterisk where your DTLS private key is
dtlssetup=actpass ; Tell Asterisk to use actpass SDP parameter when setting up DTLS
Trong các tệp SIP.Conf và RTP.Conf, bạn cũng cần thêm hoặc giải nén các dòng:
icesupport = true
stunaddr = stun.l.google.com:19302
Cuối cùng, thiết lập các tiện ích mở rộng.conf:
;extensions.conf
[default]
exten => 1060,1,Dial(SIP/1060) ; Dialing 1060 will call the SIP client registered to 1060
Định cấu hình Odoo VoIP
Trong Odoo, cấu hình nên được thực hiện theo sở thích của người dùng.
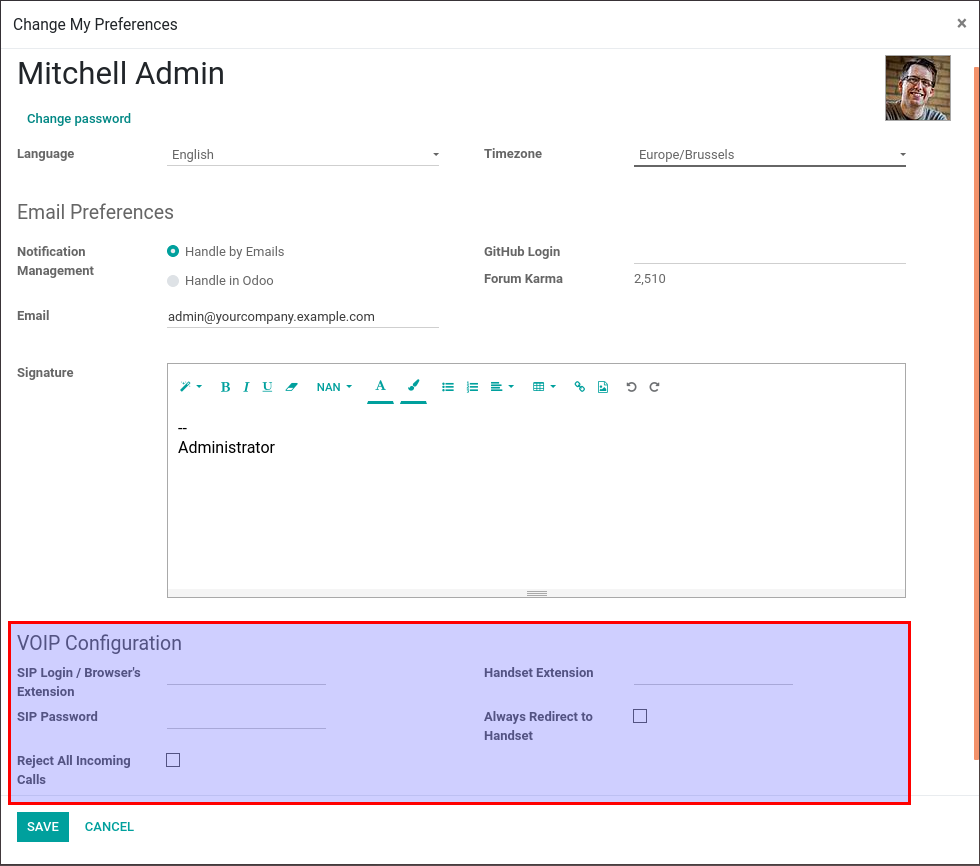
The SIP Login/Browser's Extension is the number you configured previously in the sip.conf file (in our example: 1060).
Mật khẩu SIP là bí mật bạn đã chọn trong tệp SIP.conf.
Việc mở rộng điện thoại của văn phòng của bạn không phải là một trường bắt buộc nhưng nó được sử dụng nếu bạn muốn chuyển cuộc gọi của mình từ ODOO sang điện thoại bên ngoài cũng được cấu hình trong tệp SIP.Conf.
Cấu hình cũng nên được thực hiện trong các cài đặt chung trong phần "Tích hợp".
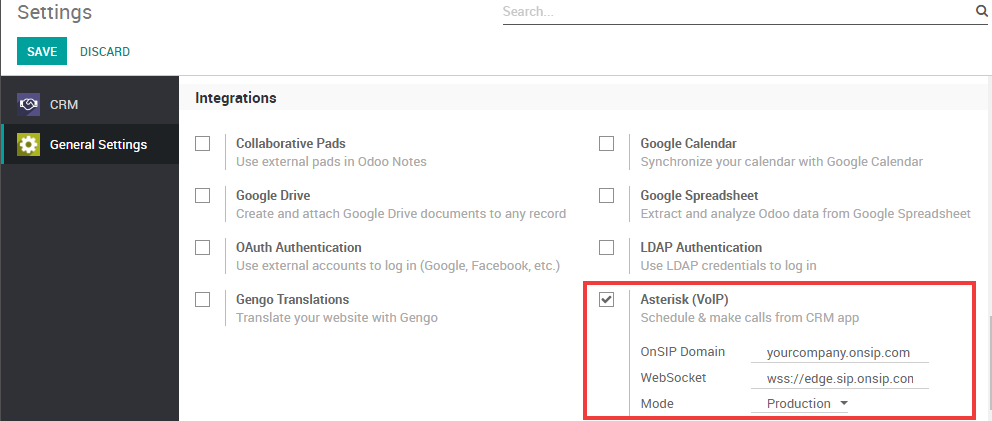
IP máy chủ PBX phải giống như IP bạn xác định trong tệp http.conf.
The WebSocket should be: ws://localhost:XXXX/ws where "localhost" needs to be the same as the IP defined previously and "XXXX" needs to be the port defined in the http.conf file.